Selecting Quality Beef - from The River Cottage Meat Book by Hugh Fearnley-Whittingstall and Steaks, Chops, Roasts, and Ribs
High quality beef should have a deep red color, almost purplish, not pink or bright crimson. It should look dry but shiny, rather than wet or sweating and tacky to the touch. Beef that is not frozen should be able to have a dent placed in it with pressure from the thumb, remain for some time and then bounce back.
Some marbling should be present as this will add to the tenderness of the meat and will affect the flavor to some extent. There should also be a rind of fat on the outside.
High quality beef will have been 'dry aged' or hung in a cooler for a minimum of 2 weeks. This is critical. Dry aging radically alters both the taste and texture of the meat. Dry aged beef will be more tender and juicy, with more flavor than beef that has been inadequately hung or inappropriately aged. Beef from the grocery store is often vacuum sealed and is 'wet aged'. This type of beef paradoxically will be drier when it is cooked and have less flavor.
Primal cuts of beef from the bottom to top of the calf (see diagram below)
Round - just above the hind leg. The part closest to the leg is called the heel of the round or round tip. Just above the heel is the bottom round which is generally quite tough. Above that lies the eye of the round which makes an excellent roast. The top round lies just above the eye of round. Top round should be slow roasted in a pan with some water or with moistened vegetables.
Rump - taken from the upper part of the round. The rump tends to be tastier and chewier than the rest of the round. Makes the best steak tartare.
Loin - extends from the round forward to the ribs. The loin is divided (from back to front) into the sirloin, short loin and tenderloin. The tenderloin lies just under the sirloin. The sirloin is the source of the tri-tip roast. A t-bone or Porterhouse (an extra-large t-bone) steak is a cross section of the unfilleted loin. On one side is the fillet (tenderloin) and on the other side is the NY strip (a.k.a. KC strip or Delmonico). The fillet is the most tender portion of the carcass with the exception of sexually mature bulls who use that muscle extensively during their lifetime making that cut tougher and more sinewy than in steers or heifers.
Flank - the area on the beef low on the stomach just before the ribs. A fatty meat. Can be cut up into flank steak or a London broil.
Plate - the fore portion of the lower belly. Can be cut up into short ribs, skirt and hanger steak. Pastrami comes from the plate.
Rib - in the U.S. the standing rib roast is seven ribs and is thought by many to be the ultimate piece of roasting beef. The untrimmed rib gives us rib steaks (i.e. bone in) while the trimmed rib gives us the rib eye steak.
Chuck - the meat between the neck and shoulder blade. Tends to have less meat a tends to be a bit tougher. If not coming as a roast is often used for stew meats.
Brisket/shank - cut further up from the ribcage. Tends to be fatty. Shank is the top joint of the foreleg
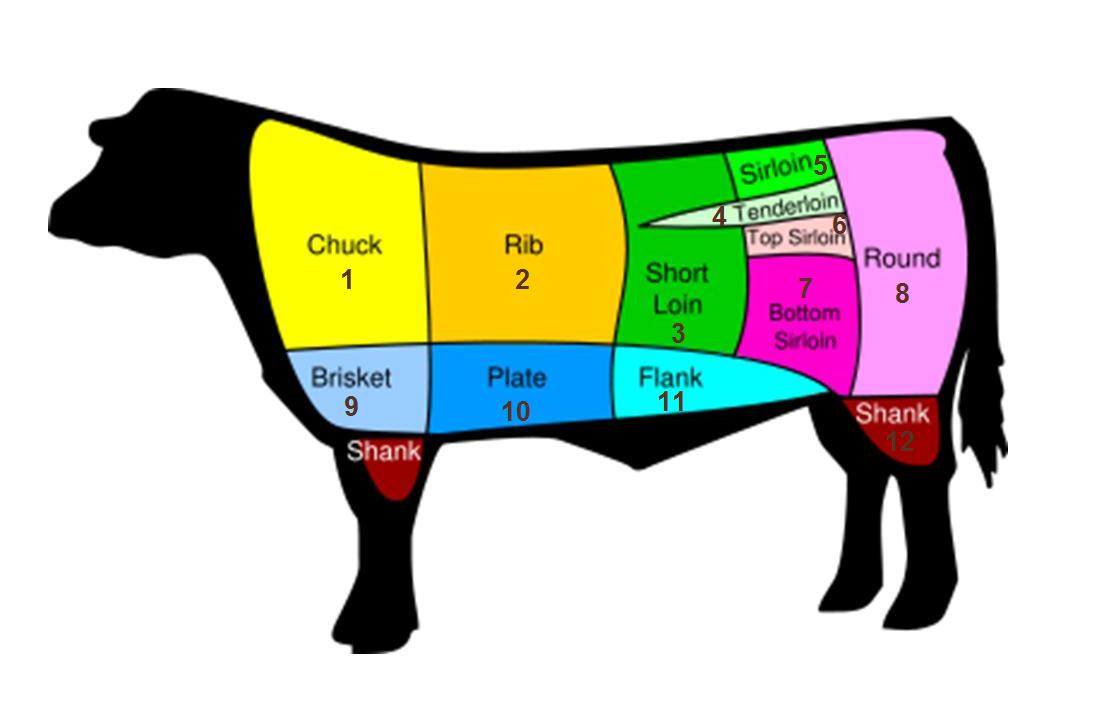
Remember that the tenderness of a piece of meat depends on the amount of work a particular muscle does. The areas along the back of the calf (loin, ribs, and rump) don't get as much exercise as the neck, shoulders, brisket, and flank. Tender steaks and roasts from the animal's back can be cooked quickly by dry heat methods such as grilling or frying while tougher cuts require most, slow heat of braising or stewing. Tougher cuts however tend to have more flavor than the more tender cuts.
Grades of Beef
Beef that is transported across state lines after butchering must be inspected by the U.S. Department of Agriculture (USDA). Beef that is not transported across state lines may be state inspected. Processors can choose whether they wish to have their meat graded for quality. If they choose to do so, grading of the beef is done to assess the alleged quality. Federal quality grading of beef is based on the age of the animal, the degree of fat in the muscle (marbling), and the physique of the animal.
About 2% of beef is USDA Prime. This beef has the greatest amount of marbling and fat. Most of it is exported to Japan where consumers there most value a high degree of fat in their steak. The remainder is sold to restaurants and specialty grocery stores. It is interesting that the U.S. and Japan are the only countries where a high degree of marbling is valued. In South America, Europe and Africa consumers prefer a leaner beef. Although beef with more marbling tends to be more tender, the taste may often be more bland than advertised. While some flavors and vitamins (Vitamins A, D, E and K) are soluble only in fat, fat by itself has very little flavor (try eating a piece of uncooked fat - pretty bland), most beef flavor or umami is contained in the meat and water trapped in between the meat fibers.
USDA Choice beef represents about 67% of all graded beef. Next to USDA Prime it has the most amount of marbling and fat and is the beef most commonly consumed in the U.S.
USDA Select is a leaner meat. As a comparison, USDA Choice ribeye steaks will have about 5% of its weight in intramuscular fat while USDA Select ribeye would have around 3.5% of its weight in intramuscular fat.
There are also lower grades below USDA Select such as Standard, Commercial, Utility, Cutter and Canner but are rarely seen in a meat case as steaks or roasts and are usually sold as ground beef, for soups, hot dogs or dog food. These grades of beef typically come from dairy cows that are culled from the milking herd.
Choosing Your Favorite Cut of Beef
Personal opinion about what constitutes a great piece of beef varies depending on the culture a person comes from as well as their specific likes and dislikes. Some will prefer the tender and nearly fatless filet mignon while others prefer the more flavorful and chewy flank or chuck cuts.
As a general rule the most tender cut of beef is the fillet or tenderloin. Next are cuts from the remainder of the loin including the K.C. (or N.Y.) strip, t-bone and porterhouse. Next are cuts from the rib including rib steak (bone in) or ribeye (bone removed) which tend to be fattier but many feel possess more flavor. The less tender cuts include the sirloin, round or chuck steaks or roasts. These tend to be chewier and fattier and are often used for slow roasting to break down the stringier fat layered throughout these cuts.
Cooking Meat 101
There are three basic tenets that are integral to meat cookers regardless of the method. These include:
1. Brown is good - meat with a browned exterior tastes better due to something called the Maillard reactions, named after the French chemist who first described these reactions over 100 years ago. When the natural proteins and sugars in meat are subjected to intense heat, they begin to combine and form new compounds. Those new compounds break down and form new flavorful compounds, and so on like generations of rabbits multiplying. This creates complex flavors that make cooked meat much, much preferable to raw meat.
2. Knowing when the meat is done - this can be done by either feel or by measuring the temperature with a thermometer. Using a thermometer takes out some of the subjectivity and may be more reliable for the less experienced. For those who test meat by feel, a 'rule of thumb' (pun intended) is to compare the firmness of the beef to the meaty portion of your thumb in different positions. With the thumb and index finger touching at their tips, the meaty portion of the thumb will give the feel of a rare piece of beef. With the thumb and the middle finger touching the feel will be that of a medium piece of beef, thumb and ring finger medium well, and thumb and little finger well done.
3. Let the meat rest after cooking - by not rushing the beef directly to the plate, you will enjoy beef that is on average 40% more juicy than the same beef placed directly on the plate and served. Here's why. As proteins in the meat heat up during cookery, they will uncoil and then reconnect in different configurations in a process called coagulation. During that uncoiling and reconnecting process, the water trapped in between those protein molecules is squeezed out and is driven toward the center of the meat. During the rest period, some water will be reabsorbed by the coagulated protein molecules throughout the meat. Thus steak that is rested is juicier, more tender and has a less gray appearance than steaks that are placed directly on the plate from the heat source (grill, stove, oven, etc.).
Roasting
Roasting is the ultimate test of beef quality. The best roast you ever taste will be the best piece of meat you ever buy and the best meat you ever taste will probably have been roasted. Choose beef that has been adequately hung (at least 14 days). Some of the best types of meat for roasting include the prime rib roast (the meat of the Gods in my opinion), sirloin tip or Pike's Peak. Place the roast into a pan preferably with a roasting rack. By raising the meat on a rack above the fat and juices that will drip down during roasting you will prevent the bottom portion of the roast from becoming more gelatinous and greasy. Divide the cooking into three parts: the' half-hour sizzle' at 400-450 degrees, the cooking at 325 to 350 degrees, and the 'rest'.
The 'half-hour sizzle' is a means of creating a crisp, caramelized coating with an abundance of "browning flavors." A half-hour at 400-450 degrees for a lightly salted piece of roast is enough to create such a flavorful exterior. While salt will draw out some of the moisture in the roast it will also add significantly to its flavor (use a light coating of olive oil on the roast to make the salt stick to the meat). Although it has become cooking legend that searing the outside of a piece of meat is a way to lock in its juices, it is not actually true since the seared crust is actually quite permeable to moisture and thus the 'half-hour sizzle' could actually come at any point in the roasting. As a matter of convention however, most people will place the searing of the meat at the beginning of roasting since warmed meat will give up more moisture than meat that is initially cool and then heated very quickly. It is also an oversimplification to state that a half-hour sizzle is a required amount of time when in fact larger roasts may take longer to create the seared, crusty exterior while smaller roasts may take less time. Be sure to preheat the oven prior to the half-hour sizzle before placing the roast into the oven.
The second part is the cooking phase and is done at 325 to 350 degrees. The period of time involved in this phase is much more variable than the first and is dependent on the size and weight of the roast. The best way to determine the amount of time to keep the roast in the oven is by using a meat thermometer. Place the thermometer into the thickest part of the roast and leave it in 20 seconds before taking a reading. For beef the following parameters apply:
very rare 115 degrees
rare 125 degrees
medium 140 degrees
well done 160 degrees
Remember that these are the desired temperatures at the time the steak is put on a plate which should come after an appropriate rest period (see below). Because the steak will continue to cook during the resting process with heat moving from the outer portions of the beef to the inner portion, it is wise to pull the beef off the grill (or stove or oven), when it is approximately 5 degrees below its desired temperature (e.g. pull a steak or roast meant to be served as medium (140 degrees) when the internal temperature reaches 135 degrees).
As an alternative to measuring the inside temperature of the beef (the most reliable means), a general guideline for rib, sirloin or round cuts of beef is to allow 10 minutes per pound for a rare finish, 15 minutes per pound for medium, and 20 minutes per pound for well done.
The final part of roasting is the rest period. This is a very important part of the roasting process because the beef will lose water content as it heats up. Losing more water can decrease the juiciness and tenderness of the roast and can ruin even the best piece of beef. By letting the roast rest so that the outside and center of the roast are closer in temperature, water will effectively settle back into the meat.
Barbecuing/Grilling
There are two things to avoid with grilling or barbecuing that can ruin a great piece of beef. One is to let the direct action of the flame reach the surface of the meat. Instead of browning and caramelizing the outside of the meat, the flames deposit soot or black carbon on the beef and can leave an unpleasant taste. The second thing to avoid is excessing smoke rising from the flame due to burning fat. Fat smoke has an acrid smell that will spoil rather than complement the flavor of the meat.
As such, follow these three golden rules of barbecuing:
1. cook over embers - not flames. Resist the temptation to begin grilling while the fire is still producing flames. Wait until the wood or charcoal is glowing but shooting up flames prior to beginning the grilling. Typically this will mean that when you place your hand about 5 inches above the grill surface, you will only be able to keep it there for 3-4 seconds before needing to pull it away. Getting and keeping the proper temperature can get a bit tricky as most charcoal has a 45 minutes to 1 hour period when it can be properly used for grilling. Once you have glowing coals or embers - get to it!
2. Remove as much fat as possible. While fat is necessary to grill the perfect steak or burger, excessive fat will worsen the flavor. Using lean ground beef and cutting back the fat to 1/8" on steaks is a good way to avoid the acrid smell and off flavors of burned fat. Additionally, wipe of any excess fat or oil that accumulates on the meat prior to grilling. A light film of olive oil or other light oil will help prevent the meat from sticking to the grill but excessive amounts will dampen the eating experience.
3. Be generous with the wood or charcoal. Do not put yourself in a position where you have to refuel during the grilling process as this will create more flames and violate golden rule #1. For grilling steaks, use tongs to pick the meat up at sharp objects used to pick up the beef will allow more of the moisture to escape and make the steak less tender and juicy. It may also be helpful to create two different cooking surfaces on your grill with different temperatures (either by piling the charcoal on one side of the grill or adjusting the gas burners). This will allow you more flexibility in grilling beef to different levels of doneness. For example, a rare to medium rare steak could be taken off the grill entirely after searing while a piece of beef that needed to be well done could be moved over to the cooler side of the grill after searing to allow more heat to penetrate its center.
And finally...to salt or not to salt, that is the question...The questions of when and how must to salt a steak may have as many answers as there are grillers. In general salt will pull water out of the beef and toward the surface making it drier (the same is true when meat is roasted - see above). On the other hand salt adds significant flavor to the brown crust of a great tasting piece of beef. Some chefs insist on adding salt and pepper to the raw meat prior to beginning the grilling process while others will only place it on the already seared side of the meat (just prior to turning) and others will salt only after the meat is completely grilled and in the rest phase. Personally I like the added flavor of the salt and thus prefer salted over unsalted beef. I also tend to apply the salt after applying a thin layer of olive oil on both sides of the raw beef before grilling. This causes the salt to stick to the surface more and, in my opinion, adds more of the salty taste to the exterior of the brown beefy crust. Table salt works fine but a coarser sea salt seems to be more easily absorbed by the meat.
Tips for grilling burgers
Burgers should be made as close to grilling time as possible. A thick ball will of course result in a burger that is more pink in the middle. A thick rounded burger like this will have various textures with the ends being more crisp and caramelized with the center being more juicy and tender. An alternative to this and a way to get a more uniform doneness to the burger is to think out the center of the burger and make the ends thicker (an inverted discus of sorts).
Brushing on a light coat of olive oil will prevent the burgers from sticking to the grill as will leaving the burger on one side for a longer period of time. Place the burger on the grill while it is very hot to sear the outside and create the great caramelized flavors that make barbecuing and grilling beef such a great eating experience. Don't forget to lightly salt and pepper the burger just prior to flipping it onto its opposite side.
Pan-Searing
The key to browning steaks in a pan is to preheat the pan so that it is hot enough to sear the beef before being overcooked. A cast iron skillet will do a great job of heating evenly and searing steaks although if you are making beef sauces in the same skillet be warned as the iron will often react with acidic foods (citrus, etc.) giving the sauce a metallic flavor.
When pan searing several steaks leave at least 1/4 inch of space between steaks so that they may sear and not steam. Do not move the steaks around in the pan as this will interrupt the browning process and the beef will lack adequate carmelization.